Thursday, 30 August 2012

Copper Casting


Today I cast the material from which I will be forging the hilt parts for the sword.

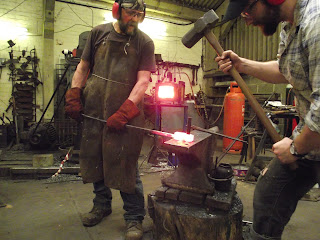
We made a ladle and a simple ingot mould 1”x1”x6”.  I chopped up some copper and heated it in the forge.


The mould was placed on a bed of sand in the leg vice to catch any liquid copper that missed in the pour.


I desperately wanted to video the pour, but the batteries in my camera had other ideas…I also did a water cast which was very exciting but got no pictures of that either!

 I will be doing another large water cast soon as part of a commission, so I will document that properly.


The black material is borax, adhered to the surface of the ingot.


Tomorrow I will begin hot forging the copper into the right forms to make the guards.
 
I love liquid metal.


Wednesday, 29 August 2012

Polished


This sword is now polished and awaits its hilt parts.


It won’t be etched until the entire hilt fitting has been concluded to avoid accidental scuffing of the surface that would require further polishing to remove.

It has been hand rubbed to a 300 grit finish, whilst I could clearly polish it further, I subscribe to the theory that the acid works better if it has a “ground” to bite into, rather than a totally smooth 1200 grit finish.

As it is though, the effect of the steel has a satin quality that I have always found entrancing.

Another joy at this stage is the texture and patterning of the folded steel is revealed upon intimate inspection of the surface. It is impossible to photograph (at least with my ability), but if held in a certain way, at a certain angle at good light – the whole mystery can be read and absorbed. 


Thursday, 23 August 2012

Test Etch

Heres a snap shot of the folded steel on this sword

 
Not a proper polish, not a proper etch, but I am excited and very pleased.

Wednesday, 22 August 2012

Swords: Update


Here’s a quick recap.


Two weeks ago there was this
 

And then there was a lot of this
 

And some more of that


And now we have this.
 
Lots of polishing this week. Maybe make a start on the hilt. We shall see.
But In the meantime, I want to show how the tang of this sword was forged as it was welded on separately rather than simply being drawn out of the sword billet.
 
This is beneficial for a few reasons, namely not sacrificing any of the blades length but also welding on a separate piece of soft iron will make final peening of the tang easier when it comes finish and fit the hilt.
Firstly, the "handle" was cut off. This handle was is part of the sword and runs internally along the blades entire length. Once this had been cut off, it left a stub of steel that did not match the taper of the rest of the blade so it was from here that the new tang of mild steel was welded on
At welding temperature, this was “necked- in” forming the shoulders of tang but also upsetting the tang stub, providing more material to weld the soft tang to.  The tang material is shown on the anvil, it was a piece of scrap bent double and hammered in place.


Thursday, 16 August 2012

The Keeble Hoard: Swords, continued.


Two days ago I began welding and folding the steel to create the desired number of layers.  Today the sword is fully forged out with a tang forge welded on and I have begun the polishing.

Here’s the life story of this sword so far.

This sword was born from this 10 layer billet.
The initial welding pass. After this the billet was drawn out,


All the surfaces were ground clean

The billet was slashed to allow the folding (quadrupling the layers to forty)


This was welded together, drawn out again


and chopped into four (120 layers) and welded again. Shown next to partner billet.


This was folded a further three times and forged out to a billet around 16” long 2” with and half an inch thick. I did a very quick polish and etch to see what the steel was looking like. This was around a two minute etching in ferric chloride.


I decided that the steel did not require any further folding and so I moved on to the next stage of the swords manufacture which is to forge weld the two halves of folded steel around a soft core of iron or in this case mild steel. This is a medieval method of sword construction that has several benefits to consider.

 Firstly this method requires less “good” steel, which in historical terms meant a lower cost of raw materials as high quality carbon steel was a hugely expensive. Furthermore, folded steel (such as I have produced) can be used more sparingly, making it go further.

 Another benefit of this style is the incorporate a rod of un-hardenable material right through the heart of blade making it considerably less likely to break in use as and crack will quickly terminate when it runs into the soft core. This is the same principle as the Japanese tradition of kawahagane (hard jacket) and hagane (soft iron core).


So, the billet of folded steel was cut in half and polished on the internal face to allow a cleaner initial weld and a rod of 16mm low carbon steel was MIG welded into the centre of each side. It would be possible to do without the arc welding, with careful use of tongs, but it just makes life simpler to know that the three components are secure to start with.


When at temperature, the steel envelopes the core and then welds to itself seamlessly. This took several passes under Goliath  as I wanted it to all be done at the hottest possible temperature. Lots of flux was used and the steel was allowed to sit at the high temp for several minutes each time to ensure the borax could really get to work on all surfaces dissolving any scale.


The gap closes up and we can begin drawing out the steel to the desired length as well as setting in the distal taper.


Once the rough length has been achieved I switch to using just hand hammers.


and thats all i can show you tonight. thanks for looking. more tommorow.


Tuesday, 14 August 2012

The Keeble Hoard: Part two


Swords

Transformation is one of the most fundamental skills of the metal-smith. To take something that has had its use but become use-less and re-form it into a wholly new being is approaching magic. It is to me the single most enjoyable and important aspect of my work and forms the core of my beliefs on renewable technology, traditional methods and understanding of my medium.

Forge welding is one of these transformative processes that can allow the Artist–Metalsmith to take differing steels and Irons and create a new piece of fabric that can then be formed into the object.

Different metals such as an ancient Plough found on the farm (itself a composite object, being made of forge-welded Shear steel and wrought iron made by hands of men long dead), Farriers rasps put beyond their intended use and ruined railings. These steels can be brought together to form, literally, a new and unique piece of steel.  

With its own unique surface patterns in the polished steel being produced by laborious folding and re-welding process to continually raise the number of total layers in the steel, quickly a number is reached where every sequential hammers blows dictates the “flow” and orientation of the grain pattern this creates a luxurious pattern likened to wood grain and made widely famous by the methods of Nihonto Japanese sword smiths.

As part of the on-going wedding commission I have been asked to produce a pair of wedding swords that are matched in the sense that they are both made from the same source materials.

These swords are special as they are heavily symbolic for the couple representing Ancestry and Protection. The swords form a central part of the customer’s ceremony.  

This will be a lengthy, but highly rewarding process which I will document here.

The following WIP (work in progress) will endeavour to educate those interested in my methods of producing a sword. If there are any areas of the process that I skip over that you would like to ask me about, then please don’t hesitate to ask.


This is the first of the two swords that I am to produce


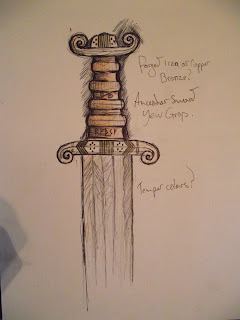
The hilt is forged copper and the grip is carved yew heart, the blade will be of the classical Nordic single edge

 Firstly we have the raw materials

 The plough was cut into equal sections and then forged flat to even out the surface texture pitting


After this, the two billets were made up out of equal parts of the various steels.


These were then stacked and weighed as being 2.5 kg each I am expecting to lose  a given amount(25%?) through the multiple welding passes and grinding etc but I will be interested to see just how much disappears into the ether.
More to come tomorrow


Friday, 3 August 2012

The Keeble Hoard

Part one- The Axe

I have an on-going commission to produce some wedding artefacts for a couple based in the east of Scotland.

The first object I have completed is a long-hafted Dane type axe with a decorated head.

The head was forged from mild steel and has no edge or temper as it is a piece of wedding regalia and won’t be expected to “work” for a living. ( But just as easily could’ve had a carbon steel  edge forge-welded in place. )

The eye was punched traditionally and then drifted out to the final size.

The forging operation was done mostly with my 14lb sledge and drifts.

A good tip – we keep a pot of lambs fat or tallow by the anvil for lubricating drifts and punches, as the grease flashes into flame, there is a layer carbon left on both surface that really helps prevent the tools from getting stuck.

And it smells like dinner!

(I forgot my bandanna at home so unfortunately it was baseball cap time…. However it does say Vulcan on it, so not totally inappropriate…)

The anvil is usually cleaner than that, but it does get pretty grimy when using a lot of tallow.